s1it3: The Slide 10 Lite version.
Did you know that you can buy an "out of updates" Mac for less than U$100 and turn it into a Linux beast? Yes, or install Windows onto it but this would be nonsense...
Right, pick up yours from wherever you like and follow those simple steps in order to have it working in a few hours.
1- Before installing rEFInd check your Mac (Only x86_64, that's the INTEL mac) from terminal using the following command:
csrutil -status
This will show you if your SIP (system integrity protection) is enabled or not, which is a requirement to install rEFInd to your EFI.
If you got a "Disabled" reply, you are good to go.
Usually you will get SIP "Enabled", since it's the default state of any mac, and you have to disable it -at least temporarily- in order to install rEFInd, a boot chooser, to your mac startup.
Let's do it...
2- Restart your Mac in recovery mode (Cmd+R at startup before the lovely mac chime)
From recovery environment run terminal (Utilities/terminal) and execute
csrutil disable
If you wish, you can install rEFInd right now, by following the procedures described later on rEFInd website:.
Note: If you see no option to launch the Terminal, disabling FileVault may help. I've received some reports of the Terminal being missing from the Recovery boot, one of which indicates that FileVault is the cause.
-
Download the rEFInd binary .zip file and unpack it. You can unpack it on your regular hard disk or on a USB flash drive. Pay attention to where it's located, though; you'll need to find it later. Pay attention to both the name of the volume and the complete path to the directory in which it's stored. (Your home directory is normally /Users/yourname, where yourname is your username. Your Desktop is normally /Users/yourname/Desktop.
-
Reboot the computer.
-
At the startup chime, hold down the Command+R key combination. The computer should launch into the Recovery system. This is a very bare system, with only a window providing a way to launch a handful of utilities and a menu bar. You must use the latter.
-
Select Utilities -> Terminal from the menu bar. A Terminal window should open.
-
If you unpacked rEFInd on a USB flash drive, insert it and wait for its access light (if it has one) to stop blinking.
-
Increase the size of the Terminal a bit. (This just makes its output more legible, since the next step produces long lines.)
-
Type df -h in the Terminal. This produces a list of partitions that are mounted. Locate the one on which you unpacked the rEFInd files. It will normally be /Volumes/Somename, where Somename is the volume's name.
-
In the Terminal, use cd to change to the directory where the rEFInd files you unpacked earlier are stored. For instance, on my MacBook, I would type cd /Volumes/Macintosh\ HD/Users/rodsmith/Desktop/refind-0.11.5. Note that if any element of this path includes a space, you must either enclose the entire path in quotes or precede the space with a backslash (\), as in this example's Macintosh\ HD volume name.
-
Type ls to verify that refind-install is present in this directory.
-
Type ./refind-install to run the installation script. It should run normally, as described on the Installing rEFInd page. You can add options, if you like, as described on that page. Alternatively, you can perform a manual installation, also as described on that page.
-
Reboot.
Or you can restart and repeat the first procedure, to double check if SIP (System Integrity Protection) is disabled since it usually requires reboot.
​
3- Now, let's download Slide from https://slide.computersouth.com.ar/slide-latest.iso and md5 checksum file https://slide.computersouth.com.ar/slide-latest.md5sum
Plug your USB and type from terminal
diskutil list
Properly identify your USB that will be listed as (Caution here, errors or mistyped letters will erase destination disk content!):
/dev/diskX (X=a number)
Copy your ISO to any -larger than 1GB- pendrive.
​​
sudo dd if=/Users/ME/Downloads/slide-latest.iso of=/dev/diskX bs=512
​​
4- Once Csrutil is disabled we can proceed to install rEFInd.
Download it from https://sourceforge.net/projects/refind/
Decompress it and remember in which folder is located.
It is important to plug the recently created Slide USB disk for rEFInd to find it and install proper drivers.
From terminal execute it within the downloaded folder, usually /Users/ME/Downloads/ by typing
refind-install
And with the confirmation that rEFInd has been properly installed you can restart your Mac and choose to boot from the recently created Slide USB.
rEFInd home is https://www.rodsbooks.com/refind/
All Slide software included is listed here: https://slide.computersouth.com.ar/software and the server hosting the site is running Slide!
Current updates are listed here: https://slide.computersouth.com.ar/updates
Username: slide or root
Pass: debian or toor
Name inspired by this passage of the 1999 movie "Fight Club":
01
Why Slide?
Created aiming an anonymous desktop (tor is working from scratch), it turned out to be faster than any desktop available out there.
Doubled swap size to increase free memory available -even on old or Ram limited computers.
4GB is the beginning of decency, but it can do 2GB decently with certain restrictions. Many "old" hardware can be used under this surprisingly low requirements but it will finally rely on powerful CPUs like the one included in any old Mac.
It also provides a more secure environment for user data, since the OS is not writable (Live CD) and physically separated from the personal files.
02
No Install + No stock apps
The main OS is debian powered with no add-ons except the featured apps required to work properly: It will usually stick below 1GB size.
You don't have to install Slide, just copy all ISO included files and remember to keep it plugged onto your USB when installing rEFInd.
Apps can later be added direcly from debian repositories to a modules folder using a script named APT2FS.*
Updates from the main OS can be done securely also using a direct approach: Unsquash, chroot and update directly from debian repositories.
Then voila, just recreate the original main OS. ​
03
Portable and small, yet fast.
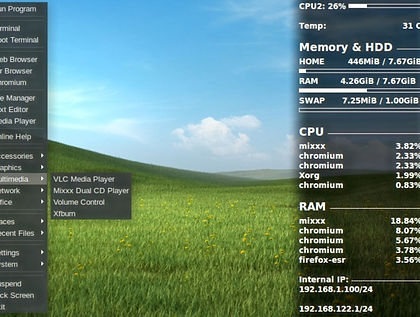
Slide uses a high compression algorithm to achieve such surprising sizes: You will have a full desktop with many applications in about only 1GB of space.
Slide performs mostly on memory, that makes any usable pendrive a candidate to host his power, and his performance seeming less and flawless compared to very expensive PCs:
Linux can perform way better than most OSS and can provide alternatives to any software available.
04
Limitless
Once you get used to this approach you'll be able to appreciate the sides to this way of working: Portability, speed and small space and hardware usage are boosted by the increased security and specificity it provides by limiting the amounts of unnecesary data you allocate on your HDDs. The creation of modules is a simple process that will allow you to modify and configure the system to your will. You'll see.